This post is a walkthrough for some pretty cool use case material that I've developed in my spare time. One of my dream-come-true use cases and you should perhaps focus a bit more or get some quiet time to continue reading through this material.
Let's look at the addressing of the issue at hand, firstly...
Persistence
The adversary is trying to maintain their foothold.
Persistence consists of techniques that adversaries use to keep access to systems across restarts, changed credentials, and other interruptions that could cut off their access. Techniques used for persistence include any access, action, or configuration changes that let them maintain their foothold on systems, such as replacing or hijacking legitimate code or adding startup code.
https://attack.mitre.org/tactics/TA0003/
Without going in to too much detail, the bellringer here is when a dropper, or directly associated malware specimen, is embedding itself in to the operating system, and you really want to know about it. From something as simple as a "Startup folder" entry all the way up to an office add-in or perhaps a context menu item, being responsible for the embed in to the windows platform.
This use case will provide the following:
- Detection of embedding on Windows servers or workstations.
- Audit data.
- Reporting of digitally signed or non-signed components.
- Obtaining actionable intelligence.
- Hardcore controls for your high-value assets.
The below illustration I've made shows us the typical path a piece of malware takes when it hits the OS:
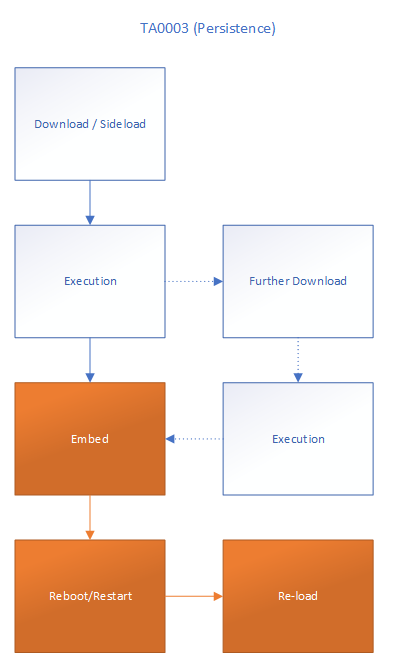
I've highlighted the area orange in which we will be working. Steps prior to the orange are unfortunately the steps that have been taken by the user or threat actors, where circumvention has happened, from HR policy being breached to layered defences such as AV, being completely passive.
Getting Started With Splunk
Our Splunk use case will be a TA that we install on Universal Forwarders, indexers and the search heads. If you want, install this on a standalone instance and it will work all the same. Obviously, this is a Windows use case, so the inputs will only work on Windows!
Download: TA-SQEYE.NET-autoruns.zip (328.54 kb)
Before deploying this to a UF, you will want to re-name the inputs.conf.save in ./local to inputs.conf - this will activate the inputs.
Also, create an index called "sqeyenet", the events will be heading there and all my examples will refer to that index.
There is nothing else you need to do! Providing the UF service account has SYSTEM or Administrator privileges, this will start to send events when the UF loads, and every 6 hours thereafter, to your sqeyenet index
After the initial load, run this search in splunk to see your data: index=sqeyenet source="sqeyenet:autoruns"
Part 2 coming soon! (Querying this data to make it actionable)